Updated 21 September 2018 and 29 August 2019. See bottom of this post.
I just received my GnuBee Personal Cloud 2 in the post. It's a device newly manufactured specifically to run completely free software, making in completely unique. The device is designed for network accessible storage, providing slots for six 3.5" hard drives.
As a brand new product, the documentation for getting started is nearly non-existant though, so here's my journey so far.
Assembly
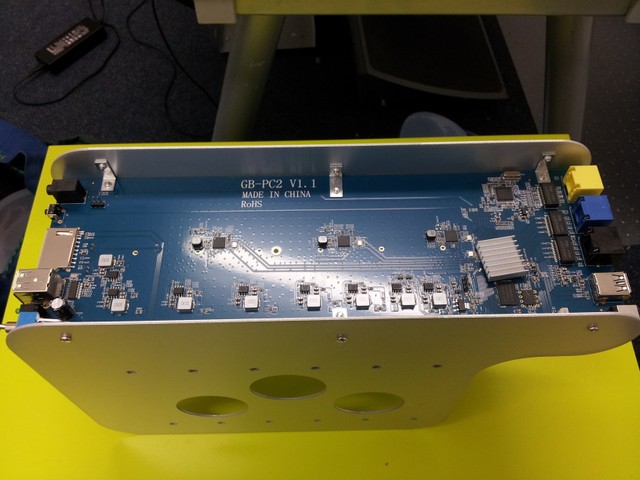
I was surprised to see that the holes for the circuit board mounting brackets didn't all line up. It turns out that the centre brackets are oriented differently to the end brackets. Look carefully at the photo below.
Getting started
The GBPC comes with the LibreCMC operating system installed in the on-board flash memory.
Based on the Background information for GnuBee PC1, I plugged a network cable in to the black socket and plugged the other end in to my computer. I then tured on the GBPC using the silver switch (red button on GBPC1). No SDCard was installed at this point.
Once it had started up, the computer connected to the GBPC's network. Visiting
http://192.168.10.1/ in a web browser showed the LibreCMC login screen. Although
it's not made clear, you can initially log in as user "root" by leaving the
password blank. You can also connect with SSH with no password by running ssh
-o StrictHostKeyChecking root@192.168.10.1 with no password. I needed the -o
StrictHostKeyChecking as I also have a GBPC1 that uses the same IP address.
Proceeding to the System/Administration section allows entry of a root password. I set up key-based SSH access at the same time. Leave "Interface" as "unspecified", uncheck password authentication and enter your SSH public key fingerprint (from .ssh/id_rsa.pub). Select "save and apply" at the bottom of the page. I was then able to log out and log back in with my new password, and connect with SSH to root@192.168.10.1.
Unfortunately I notied that after switching the device off and back on again, the password and SSH changes were reset. I'm not sure why.
Resources
The GnuBee devices are not well documented at the moment, but at present the best information can be found at:
Installing hard drives
I installed a hard drive in slot 1 and after resetting the GBPC with the black
reset button, noted that the new drive was listed under the System/Mount Points
section as filesystem "crytpo_LUKS". The second drive was an unencrypted "ext4"
drive. That didn't show up under "Mount Points" automatically and didn't seem to
mount when I selected "Add", chose the drive from the list and defined a custom
mount point /backup. There was no problem mounting this drive from the SSH
command line though.
Further work
At this point I still have a lot of questions, and not enough time to investigate them all. If you know the answers, please get in touch.
-
Do I need to install a different operating system to do something useful with the device? I was a little suprised to find that the GBPC doesn't do anything much out of the box. Not that this in any way limits the device's potential, but it's nice not to have to do everything yourself. It seems that all drive mounting must be done manually, that there's no file sharing services or even rsync installed by default.
-
How do you install software on LibreCMC? I tried the System/Software section of the web interface, but installing or searching for packages fails with an error connecting to the package repositories.
-
How do you boot from the SDCard included in my "deluxe pack"? The card appears to have Debian installed, but after insterting the SDCard and resetting, the device still seem to boot to LibreCMC. Noting that the SDCard is auto-mounted if inserted while LibreCMC is running.
-
What do the different network ports do? Black is a LAN port. Blue seems to be the WAN port as the device can ping the outside world once plugged in. The yellow port doesn't seem to do anything.
-
Can drives be made to auto-mount? I noticed that plugging in a USB drive are mounted automatically under
/tmp/run/mountd/. -
How do you connect with the USB-to-UART cable? I tried plugging it in, connecting with
picocom /dev/ttyUSB0 9600and resetting the GBPC, but only see garbage on the screen. Clearly I need different connection settings. -
Why don't password changes stick? Cleary the device is accepting some changes, because if I
mkdir /mnt/backup, the directory is still there after a power off and on. -
Can it be configured to be a DHCP client, rather than a DCHP server?
Update 5 Feb 2018
I learnt that USB-to-UART works via minicom, eg. sudo minicom -b 57600 -D
/dev/ttyUSB0. See the GnuBee
documentation. I presume that
minicom must use different defaults to picocom.
It appears that a firmware update is required to allow booting from the provided SDCard.
The network interface for LibreCMC can be changed from "static" to "DHCP client".
I'm having trouble mounting some encrypted drives. It appears that missing kernel support for "aes-xts-plain64" may be the cause.
Update 7 Feb 2018
Plugged two RAID1 drives into the GBPC2 and it correctly recognised the three
RAID partitions and allocated them to /dev/md125, /dev/md126 and
/dev/md127.
The opkg update command, as well as the web interface fail to update the
package list with:
Downloading https://librecmc.org/librecmc/downloads/snapshots/v1.4.1/ramips/mt7621/packages/Packages.gz
*** Failed to download the package list from https://librecmc.org/librecmc/downloads/snapshots/v1.4.1/ramips/mt7621/packages/Packages.gz
Downloading https://librecmc.org/librecmc/downloads/snapshots/v1.4.1/packages/mipsel_24kc/base/Packages.gz
*** Failed to download the package list from https://librecmc.org/librecmc/downloads/snapshots/v1.4.1/packages/mipsel_24kc/base/Packages.gz
Downloading https://librecmc.org/librecmc/downloads/snapshots/v1.4.1/packages/mipsel_24kc/packages/Packages.gz
*** Failed to download the package list from https://librecmc.org/librecmc/downloads/snapshots/v1.4.1/packages/mipsel_24kc/packages/Packages.gz
Collected errors:
* opkg_download: Failed to download https://librecmc.org/librecmc/downloads/snapshots/v1.4.1/ramips/mt7621/packages/Packages.gz, wget returned 5.
* opkg_download: Failed to download https://librecmc.org/librecmc/downloads/snapshots/v1.4.1/packages/mipsel_24kc/base/Packages.gz, wget returned 5.
* opkg_download: Failed to download https://librecmc.org/librecmc/downloads/snapshots/v1.4.1/packages/mipsel_24kc/packages/Packages.gz, wget returned 5.
In contrast, my LibreCMC-based router from ThinkPenguin updates and installs packages with no problems, so clearly something just isn't configured correctly.
Password changes do appear to be saved, and persist across reboots and powering off. It appears though that the small black button does a "factory reset", which resets the LibreCMC login credentials.
The hard drive idling plugin available through the web interface works well.
Slot #1 on the GBPC2 is blocked by the two 12V plastic clips. This is a minor design fault, but you can simply bend the four plastic tabs firmly down to fix the problem.
Update 21 Sep 2018
OpenWRT v18.06 was released on 31 July. This release includes support for the GnuBee PC1 and PC2 devices and represents a merge between OpenWRT and LEDE projects. Here's the GBPC2 commit. Today I've installed in on my GBPC2.
Installing OpenWRT
As per the OpenWRT quickstart and the GBPC2 OpenWRT hardware info, the images are under here. The one I needed was called "gnubee_gb-pc2-initramfs-kernel.bin". I verified the sha256sum of the file and the GnuPG signature provided.
I first plugged the serial cable into my GBPC2 and into my computer and ran
sudo minicom -b 57600 -D
/dev/ttyUSB0
. This is invaluable to be able to see
what the device is doing.
I plugged my GBPC2 directly into my computer (not a router) using the black ethernet socket and visited the web interface at http://192.168.1.1. After logging in, I went to "System", "Backup/Flash Firmware". Under "Flash new firmware image", I unchecked "Keep settings" and selected the file "gnubee_gb-pc2-initramfs-kernel.bin".
The verification page pops up and prompts you to verify that the displayed hash
matches the file you downloaded. I checked this with md5sum
openwrt-18.06.1-ramips-mt7621-gnubee_gb-pc2-initramfs-kernel.bin and proceeded
with the install. Following along on the serial console, I could see the device
reboot into OpenWRT. I found I had to switch off and on to get an IP address and
access the new web interface.
The new firmware to work well enough, but doesn't seem to include support for mounting SATA drives out of the box and would't let me install packages. To access the Internet, changed the existing network interface to "DHCP client", hit "apply and save" and plugged it into my router (weirdly there seems to be some sort of auto-revert requiring you to make the change, re-plug the device and log in in under 30 seconds or so, which took me a few shots). By looking up my router's DHCP leases, I could find what the new IP address was to connect to.
I first logged in via SSH and updated the package list with "opkg update" (web interface would work fine too). When I tried to install a package via the web interface or "opkg install" I got an error like this:
# opkg install rsync
Installing rsync (3.1.3-1) to root...
Collected errors:
 * verify_pkg_installable: Only have 0kb available on filesystem /overlay, pkg rsync needs 137
 * opkg_install_cmd: Cannot install package rsync.
I then downloaded the "gnubee_gb-pc1-squashfs-sysupgrade.bin", which I was now
able to install with the "Flash new firmware image" feature, presumably because
I already had OpenWRT installed. After repeating all the above I was able to log
in and opkg install rsync and see that my SATA drive was detected at /dev/sda.
I had some problems getting the drive to mount. Not entirely sure whether it was permissions or a missing package. I installed "mountd" which enabled automounting, but mounting was failing:
# mount -t ext4 /dev/sda /mnt
mount: mounting /dev/sda on /mnt failed: Invalid argument
I installed a few other packages including "e2fsprogs", "mount-utils" and
"kmod-fs-ext4". Eventually I realised that mkdir ~/x; mount /dev/sda1 ~/x
worked fine, so changed the permissions on /mnt to 777 which seemed to fix that.
Weird though, since I was root. Anyhow, it's working, which is good enough for now.
Update 29 Aug 2019
For some time I've been accessing my GnuBee via it's dynamic IP address, since zeroconf was no longer working after installing v18.06. That's downright painful. Today I learn that this can be fixed by installing avahi:
opkg update
opkg install avahi-daemon-service-ssh avahi-daemon-service-http
See the OpenWRT zeroconf documentation.